Inventory & Purchasing
How to Do Physical Stock Verification in a Retail Shop
A practical guide to retail stock taking, physical counts, stock differences, recounts, and accurate inventory records for small shops.

How to Do Physical Stock Verification in a Retail Shop
Physical stock verification is an important part of managing inventory in a retail shop. Your billing software or stock register may show that 50 units of a product are available, but the actual quantity on the shelf could be different.
Products may be damaged, misplaced, returned, transferred, sold without the correct entry, or recorded incorrectly when received from suppliers. Without physically checking your inventory, these differences can remain unnoticed and affect purchasing decisions and business records.
Whether you run a kirana store, pharmacy, hardware shop, clothing store, fertilizer business, or mobile accessories shop, regularly checking your physical stock helps you understand what your shop actually has.
In this guide, we will explain how to do physical stock verification, prepare for a stock count, compare actual quantities with inventory records, investigate differences, and update stock records correctly.
1. Understand What Physical Stock Verification Means
Physical stock verification means counting the products actually available in your shop and comparing those quantities with the stock recorded in your register or inventory system.
For example:
Your inventory system shows 48 packets of a product, but a physical count finds only 44 packets.
The difference is four packets. You need to investigate why the recorded quantity does not match the physical quantity.
It is useful to understand three related terms:
Stock taking: The process of counting the goods physically available in the shop.
Physical stock verification: Counting inventory and checking the actual quantities against the business records.
Stock audit: A broader review that may examine stock quantities, condition, valuation, supporting documents, and inventory controls. Depending on the context, it may involve an independent auditor or other authorised reviewer.
This article focuses on the practical stock-taking and verification process that a shop owner or store employee can carry out.
The objective is simple: make sure your recorded inventory is as close as possible to the actual stock available.
2. Why Should You Verify Physical Stock Regularly?
Maintaining an inventory system is useful, but the recorded quantity is only reliable when purchases, sales, returns, transfers, and other stock movements are entered correctly.
Physical verification helps identify problems that ordinary sales reports may not reveal.
Find missing or misplaced products
A product may be recorded as available but could be missing from the shelf, moved to another storage location, or placed in the wrong category.
A physical count helps identify these differences.
Identify billing mistakes
An employee may accidentally select the wrong product variant or quantity while creating a bill.
For example, a customer purchases a pack of 10 units, but the billing entry deducts only one unit. The inventory system will then show more stock than the shop physically has.
Identify damaged and unsaleable goods
Products may be damaged during storage, handling, or transportation. Some goods may also expire or become unsuitable for sale.
A physical review helps identify these products so they can be recorded separately.
Improve purchasing decisions
If your stock records are inaccurate, you may purchase products that are already available or fail to reorder products that are running low.
Accurate quantities make purchasing and replenishment decisions more reliable.
Improve business records
Physical stock information is also useful when reviewing closing inventory and preparing business accounts.
For guidance on managing slow-moving and unsold products, read how to identify and clear dead stock in a retail shop.
3. Decide When and How Often to Count Stock
There is no single counting frequency that suits every retail business.
A shop with 200 products may be able to complete a full physical count relatively quickly. A store with thousands of products and multiple storage areas may need a more structured schedule.
Consider two common approaches.
Full physical stock count
A full count involves checking the entire inventory during a planned counting period.
This can be useful when:
- Preparing year-end stock information
- Starting a new inventory system
- Investigating significant inventory differences
- Reviewing stock after a major operational change
- Checking the accuracy of existing records
Choose a suitable date and allow enough time to count the products carefully.
Cycle counting
Cycle counting means checking selected products or sections on a rotating schedule rather than counting everything at once.
For example:
- Count important or high-value products more frequently.
- Review fast-moving items regularly.
- Check products with repeated stock differences.
- Include slower-moving items in the broader counting schedule.
You can divide your products into groups based on value, sales frequency, and business risk.
For instance, a mobile accessories shop might check popular phone models, chargers, and expensive accessories more frequently than low-value items that sell only occasionally.
Do not treat one counting frequency as compulsory for every product. Design a schedule that suits your business and the effort required to complete accurate counts.
4. Prepare Your Shop Before Starting the Stock Count
Good preparation makes physical stock verification easier and helps prevent duplicate counting.
Do not begin randomly counting products without organising the shop first.
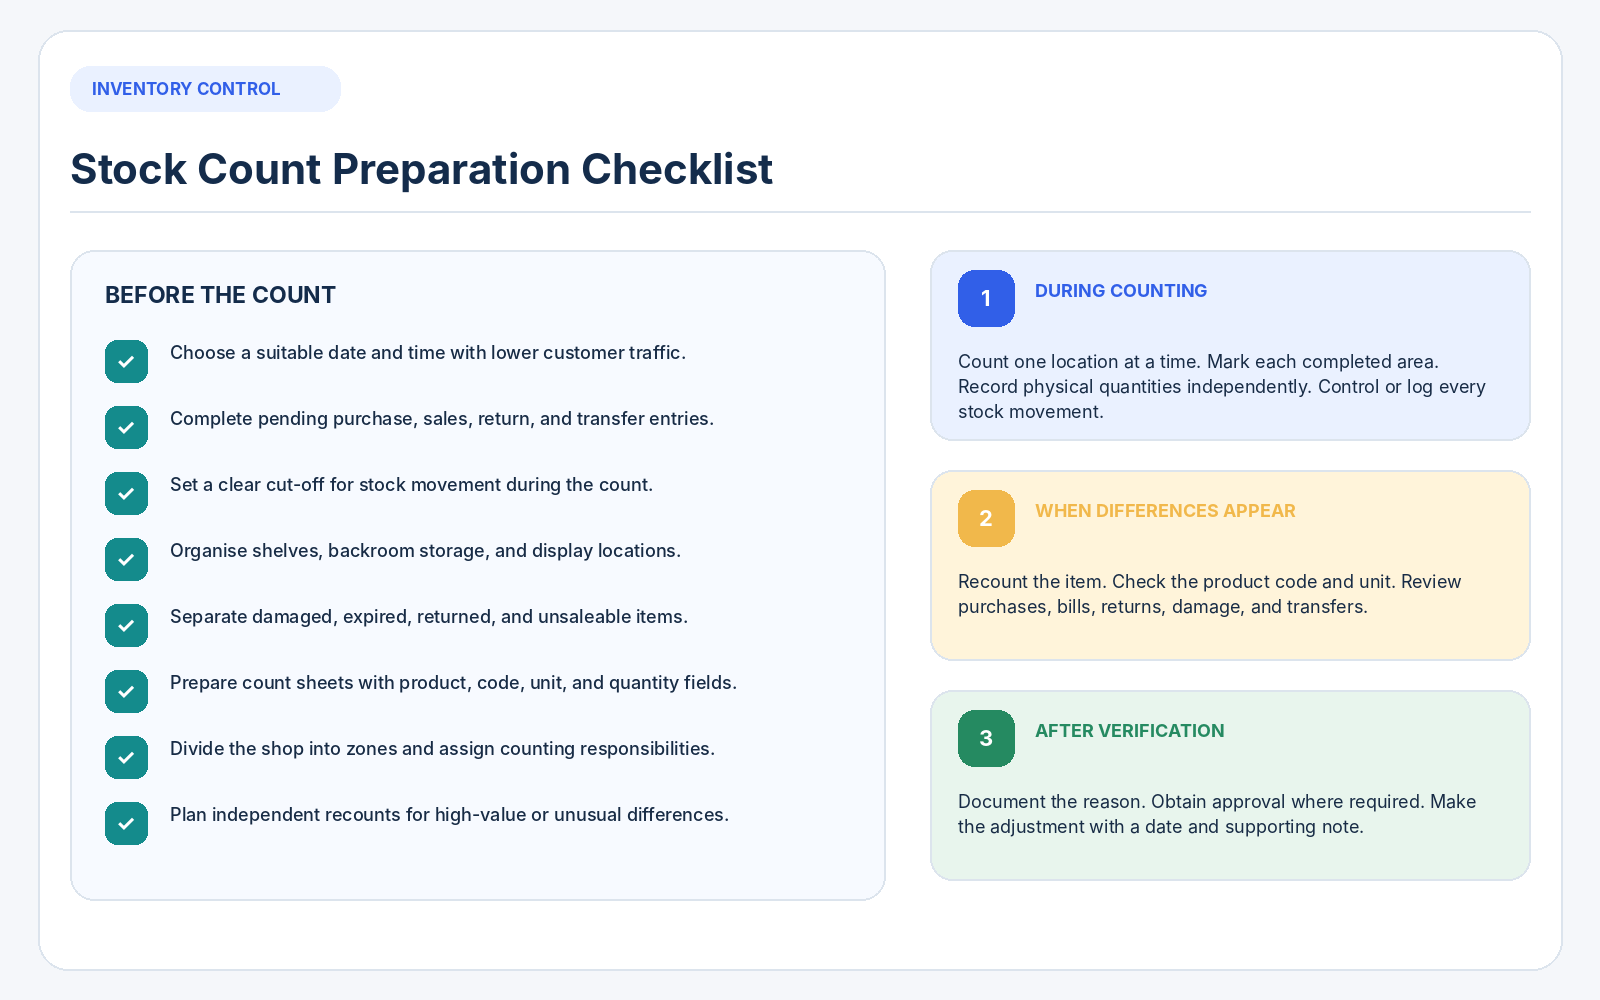
Choose a suitable counting date
Select a period when customer traffic is likely to be lower.
A quiet morning, an after-hours period, or a planned store-closure window may make the process easier.
Avoid scheduling a full count during major festival sales or other busy periods when employees may be distracted.
Complete pending stock entries
Before counting, make sure the important inventory transactions up to the counting cut-off have been recorded.
Check for:
- Supplier purchase entries
- Sales and billing transactions
- Customer returns
- Supplier returns
- Damaged or written-off products
- Stock transfers between locations
- Goods received but not yet entered
- Goods sold but not yet delivered
If these entries remain incomplete, your recorded quantity may already be incorrect before the physical count begins.
Organise products and storage areas
Group similar products together and make sure their labels or product identifiers are visible.
Separate damaged, expired, returned, and unsaleable goods from normal available inventory.
This makes it easier to count saleable stock without accidentally including products that should not be available for sale.
Divide the shop into counting zones
For example, divide a grocery shop into:
- Front shelves
- Middle shelves
- Back shelves
- Billing counter
- Storage room
- Promotional displays
Give each area a clear identifier and mark it as completed after counting.
Prepare a count sheet
Your count sheet should include:
- Product name
- Product code or SKU
- Brand and variant
- Unit of measurement
- Physical quantity
- Counted by
- Verification or recount status
- Notes about product condition
Where possible, ask employees to record physical quantities before showing them the expected system quantity. This is sometimes called a blind count and can help prevent the recorded balance from influencing the physical count.
The CBSE Retail Operations handbook discusses transaction cut-offs, freezing stock movements during physical counting, verification counts, and checking locations that may be missed. These are useful principles when preparing your own process. <Cite refs={["turn526764view0","turn526764view1"]}/>
5. Follow a Step-by-Step Physical Stock Counting Process
Once the shop is organised and the counting sheets are ready, begin the actual verification.
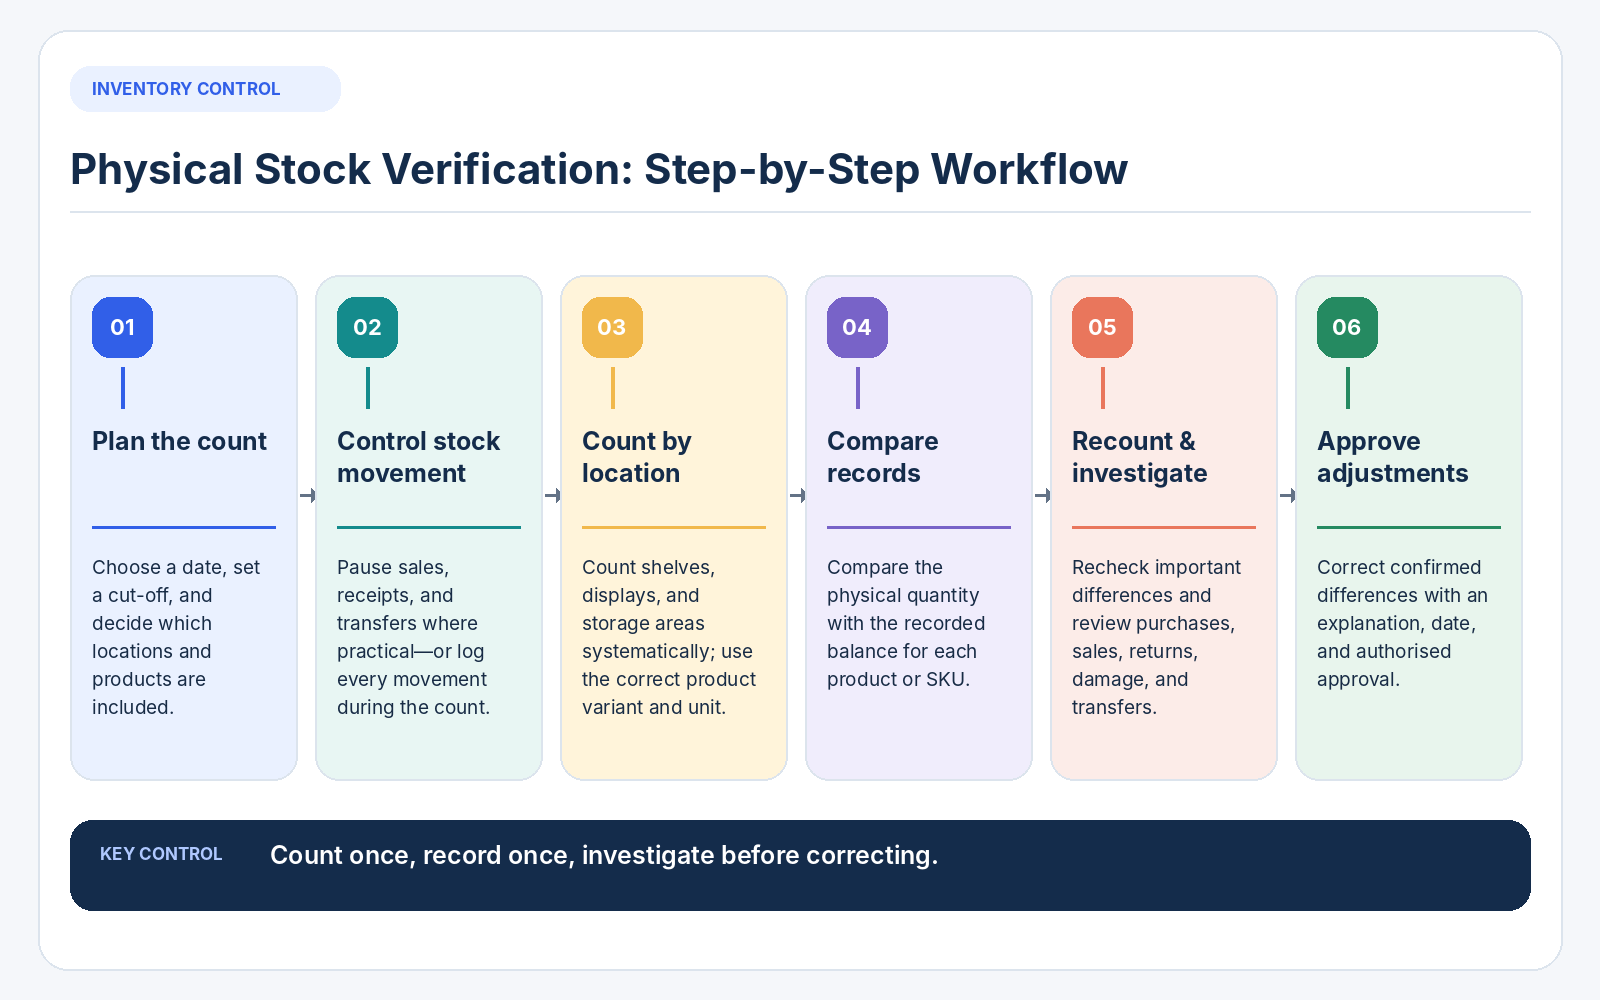
Step 1: Control stock movement
Ideally, pause sales, receiving, returns, and transfers while a full count is taking place.
This prevents a product from being counted before a transaction and then counted again after its quantity changes.
If your shop cannot close during the count, use a clear cut-off time and record every stock movement that happens while counting is in progress. Make sure those movements are included only once in the final comparison.
Step 2: Count products section by section
Follow the assigned zones in a fixed order.
For example, finish the front shelves before moving to the back storage area.
Do not jump between different sections without marking what has already been counted. This reduces the chance of missing or counting the same product twice.
Step 3: Count the correct product variant
Do not combine products merely because they look similar.
Check the product name, brand, model, size, colour, variant, or other relevant identifier.
For example, a clothing shop should count each size separately. A mobile accessories shop should distinguish cases for different phone models.
Step 4: Record the actual quantity
Count the quantity that physically exists.
If a shelf contains 12 individual units and the storage area contains another sealed carton of 24 units, record both quantities using the correct unit.
Make sure that cartons, packs, strips, kilograms, litres, and individual pieces are converted consistently.
For example, if one carton contains 20 units and there are three sealed cartons plus six loose units:
Physical quantity = (3 × 20) + 6
Physical quantity = 66 units
Step 5: Check the condition of the products
Identify damaged, expired, incomplete, or otherwise unsaleable items.
Record them separately rather than including them automatically in available saleable stock.
Step 6: Mark the completed area
Once a shelf or storage section has been counted, mark it as completed.
Avoid moving products between zones until the relevant count and verification are finished.
Step 7: Recount important items
For expensive products, high-quantity items, or products with unusual differences, perform a second count.
Where possible, have another employee verify the result independently.
6. Check All Places Where Stock May Be Located
Counting only the visible shelves is not enough.
Products may be stored in areas that employees do not normally think about during a quick stock check.
Review the following locations:
- Main shelves and display racks
- Billing counter and promotional displays
- Backroom and storage areas
- Goods received but not yet arranged
- Products reserved for customers
- Damaged-goods areas
- Products awaiting supplier returns
- Goods being transferred between locations
- Stock held for delivery or approval
You should also account for goods in transit, items reserved for customers, and any other inventory that belongs in your records but is not physically on the normal shelves.
Decide how each category will be treated in your count and document it consistently. Never count the same goods in both a storage location and an in-transit record.
A complete location check helps reduce missed inventory and inaccurate totals.
7. Compare Physical Quantities With Your Inventory Records
After completing the count, compare the actual quantities with the recorded stock balances.
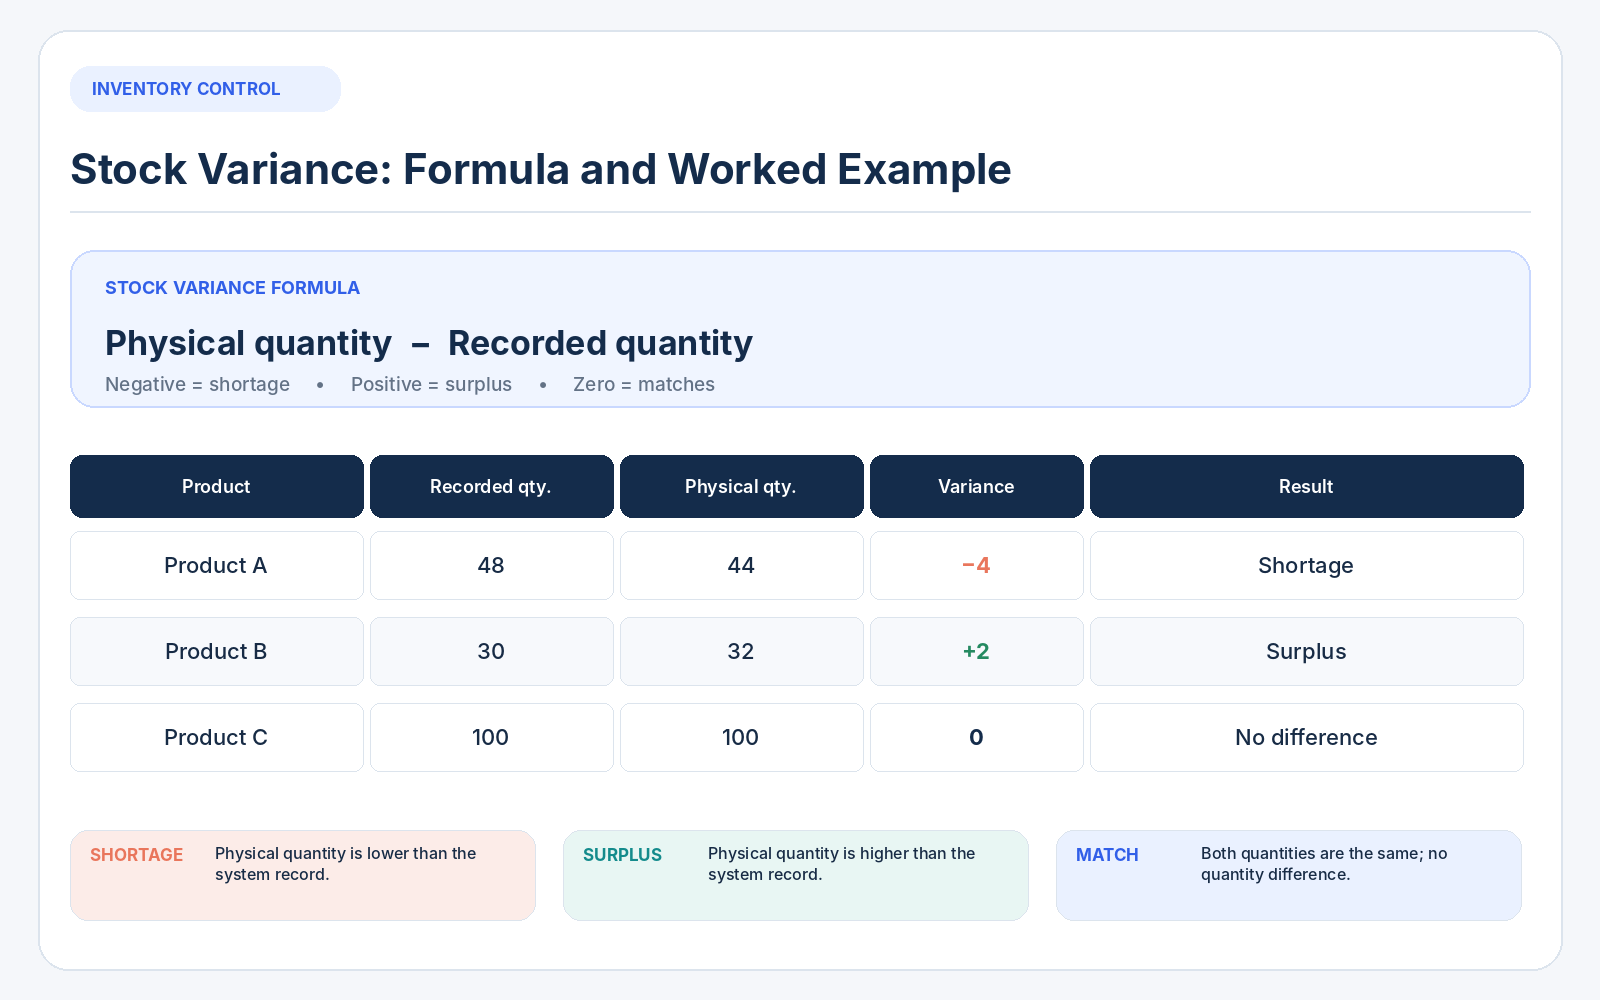
A simple formula is:
Stock variance = Physical quantity − Recorded quantity
A negative result indicates a shortage, while a positive result indicates a surplus.
Consider this example:
| Product | Recorded quantity | Physical quantity | Variance |
|---|---|---|---|
| Product A | 48 | 44 | -4 |
| Product B | 30 | 32 | +2 |
| Product C | 100 | 100 | 0 |
In this example:
- Product A has a shortage of four units.
- Product B has a surplus of two units.
- Product C matches the recorded quantity.
Do not immediately adjust these differences in the inventory system.
First, verify the count and investigate why the differences occurred.
The purpose of stock verification is not simply to make the system match the shelf. It is to understand why the two quantities were different.
8. Investigate the Reasons for Stock Differences
Once you identify a shortage or surplus, investigate the possible cause.
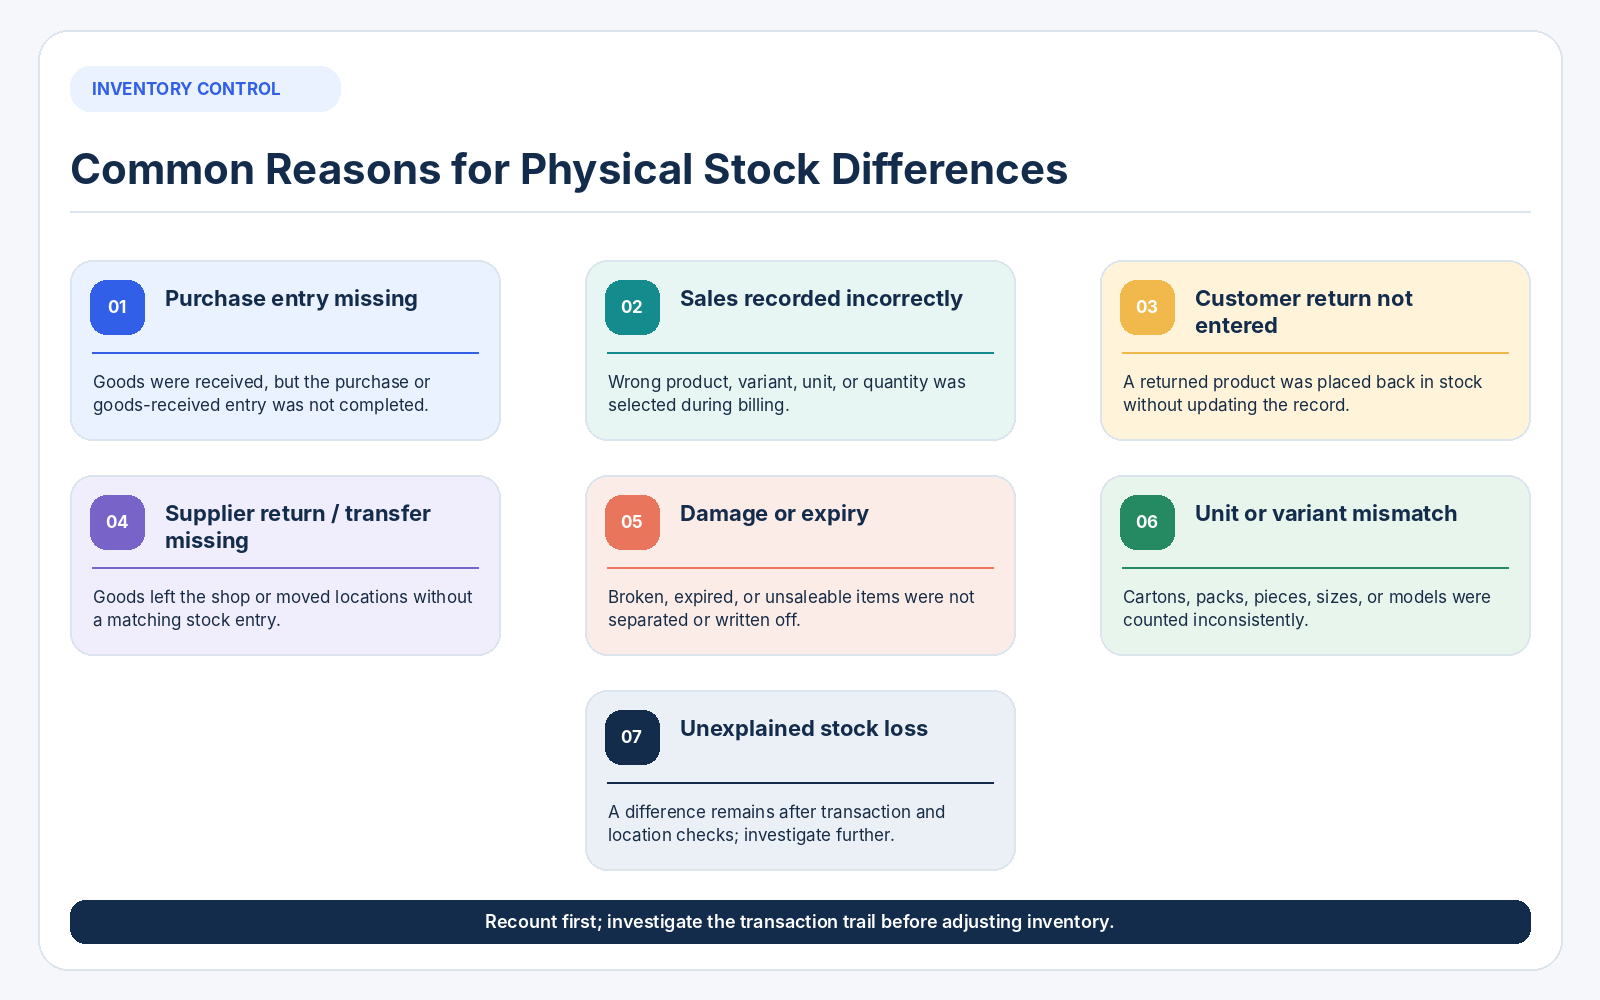
Common reasons include:
Purchase entry not completed
The shop may have received 20 units from a supplier, but the purchase entry was not recorded.
The physical quantity will then be higher than the inventory record.
Sales recorded incorrectly
An employee may have selected the wrong product or quantity during billing.
For example, a sale of five units may have reduced stock by only one unit or may have deducted five units from a different product variant.
Customer returns not recorded
A returned item may have been physically placed back on the shelf without the inventory record being updated.
Supplier returns not recorded
Products sent back to suppliers may still appear in the available stock balance.
Damage or expiry
Goods that were damaged, broken, expired, or disposed of may remain in the recorded inventory if no adjustment was entered.
Wrong product or variant selected
Similar product names, barcodes, sizes, or models can result in mistakes during purchasing and billing.
Unrecorded transfers
Stock may have been moved to another storage area or location without recording the movement.
Theft or unexplained loss
If the count is correct and the usual transaction mistakes have been ruled out, investigate whether stock loss, theft, or other unexplained movement may have occurred.
Do not assume every shortage is theft. Review the records and process first.
Maintain a variance investigation list so each difference has an identified reason, a responsible person for follow-up, and an action status.
9. Record and Approve Stock Adjustments Properly
Once a difference is confirmed and its reason is understood, update the inventory records using your shop's approved procedure.
A proper stock adjustment should include:
- Product name and code
- Previous recorded quantity
- Verified physical quantity
- Difference
- Reason for adjustment
- Date of adjustment
- Person who verified the count
- Person who approved the adjustment, where applicable
For example:
| Field | Example |
|---|---|
| Product | Product A |
| Recorded quantity | 48 units |
| Physical quantity | 44 units |
| Adjustment | -4 units |
| Reason | Confirmed damaged goods not previously recorded |
| Action | Approved stock correction |
Keep relevant supporting documents, such as damage reports, supplier correspondence, return records, or count sheets.
Avoid making unexplained adjustments simply to remove differences from the screen.
If an adjustment affects financial records or tax reporting, confirm the appropriate treatment with your accountant.
10. Calculate and Review Your Closing Stock
After all verified corrections have been approved, you can review the final stock quantities.
A basic stock quantity reconciliation is:
Closing stock quantity = Opening stock quantity + Goods received − Goods supplied ± Other stock movements
Other movements may include approved transfers, returns, damage, write-offs, and adjustments, depending on how your records are structured.
For a simple illustrative example:
| Stock movement | Quantity |
|---|---|
| Opening quantity | 100 |
| Purchases received | +50 |
| Sales | -35 |
| Customer returns accepted back into saleable stock | +2 |
| Approved damaged-stock write-off | -3 |
| Closing quantity | 114 |
The closing stock quantity is 114 units.
Remember that stock quantity and stock value are different.
Your accounting valuation method determines how inventory is valued in the financial records. Do not assume that multiplying the closing quantity by the current selling price gives the correct closing stock value.
For GST-registered businesses, Section 35 of the CGST Act and Rule 56 of the CGST Rules address accounts and stock records. Rule 56(2) specifies stock-account details for registered persons other than those paying tax under Section 10, including opening balance, receipts, supplies, losses, theft, destruction, write-offs, gifts, free samples, and closing balance. Confirm the provisions applicable to your business with your accountant. <Cite refs={["turn837690search1","turn837690search0"]}/>
You can also review the official CBIC GST accounts and records rules.
11. Make Physical Stock Verification a Regular Routine
A full physical count may take considerable time, especially if your shop has many products.
You can make the process more manageable by introducing a smaller, structured cycle-counting routine.
For example:
High-value products: Check expensive items more frequently because even a small quantity difference may represent a significant amount of money.
Fast-moving products: Check products that sell in large quantities or are frequently replenished.
Products with repeated differences: Give additional attention to items that have shown unexplained shortages or incorrect records.
Slow-moving products: Include these in periodic checks to confirm their condition, location, and recorded quantity.
Remaining products: Schedule counts for categories that are not covered by the more frequent checks.
The actual schedule should depend on the size of the shop, inventory value, stock movement, and the time available for verification.
After every count, record what was checked and what action is still pending.
This creates a record of your stock accuracy over time.
12. Use Inventory Software to Support Physical Stock Verification
A notebook or spreadsheet may be sufficient for a small shop with a limited product range.
However, as the number of products increases, manually comparing physical quantities with purchase and sales records becomes more difficult.
A suitable inventory system may help you:
- Maintain product names and codes
- View recorded stock quantities
- Review purchase and sales history
- Generate product or inventory reports
- Record authorised stock adjustments
- Retain a history of stock movements, where supported
Before selecting a system, check whether it supports the specific functions you need. Not every billing application includes a dedicated stock-taking or cycle-counting workflow.
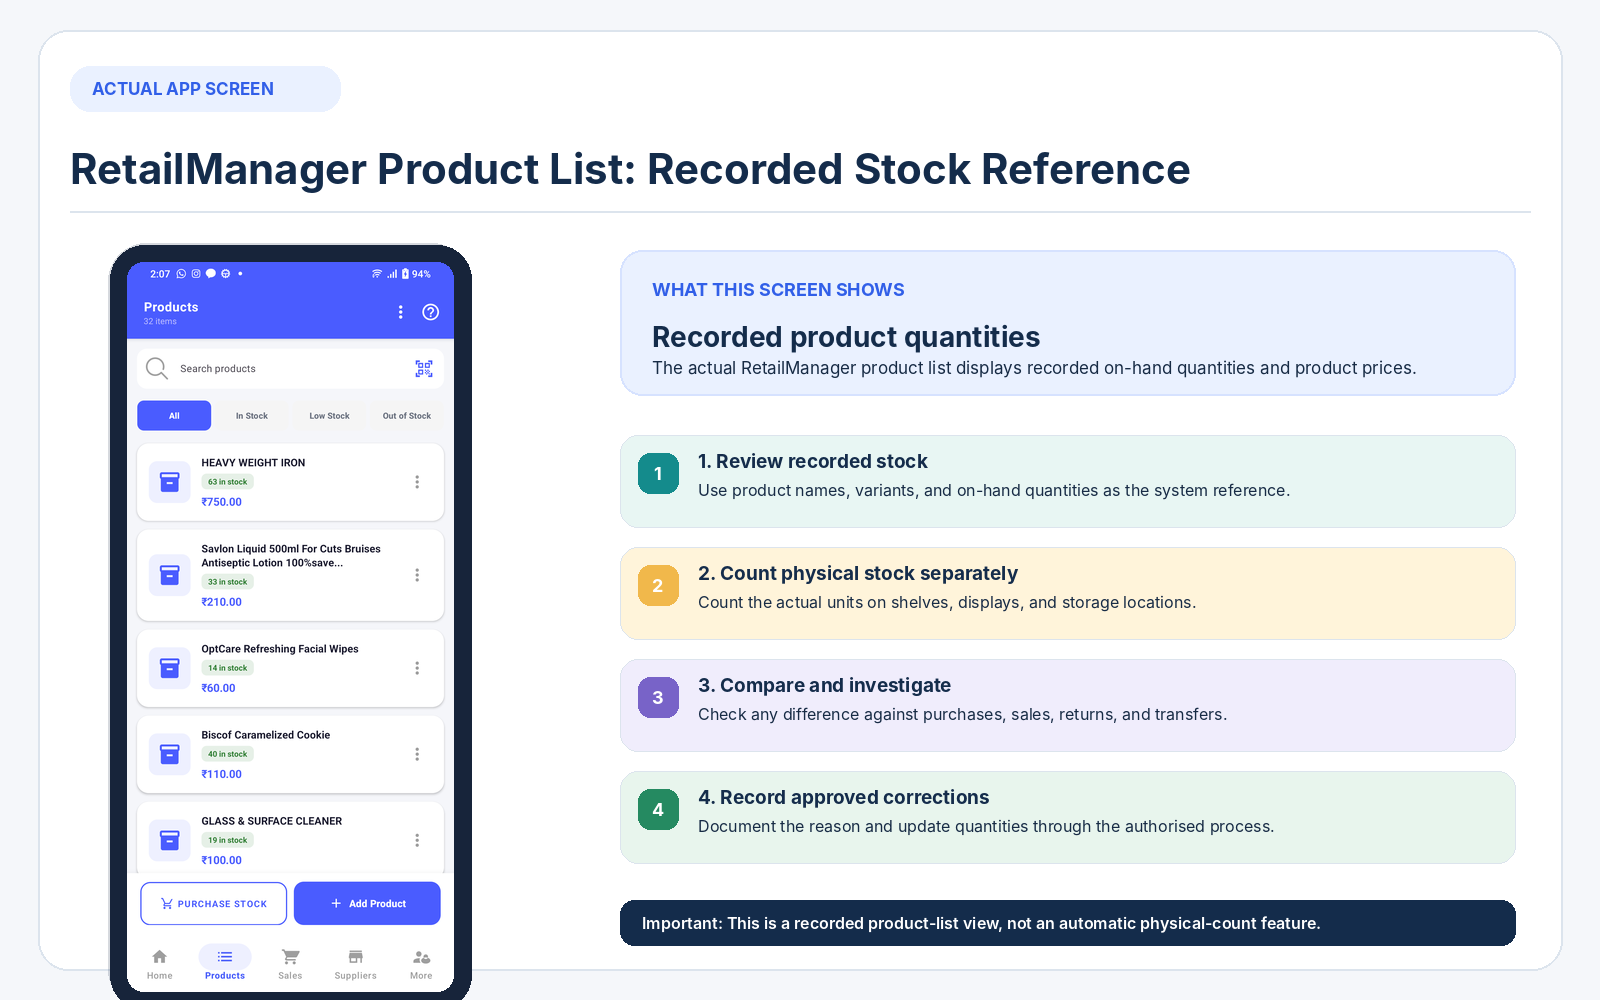
RetailManager provides product and inventory-related records and reports that retailers can evaluate as part of their stock-management process. Check its current capabilities before relying on any specific barcode-counting, automated stock-verification, or audit feature.
For a comparison of record-keeping approaches, read manual stock register versus inventory software for small shops.
You can also read how to prevent stockouts in a retail shop to understand why accurate stock quantities matter when deciding what to reorder.
Frequently Asked Questions
How often should a retail shop verify physical stock?
There is no universal frequency. It depends on the number of products, inventory value, sales volume, business risk, and time available. You can perform planned full counts and more frequent checks for important or fast-moving products.
Should I close my shop during a physical stock count?
Closing or pausing stock movements during a full count makes verification easier because sales, returns, and deliveries cannot change the quantity being counted. If closing is not practical, define a cut-off time and carefully record every stock movement during the count.
What should I do if physical stock is less than the system quantity?
First recount the item and verify its product code and unit of measurement. Then review sales, purchases, returns, damages, transfers, and other stock movements. Record the confirmed difference and make an authorised adjustment with a clear reason.
Does inventory software eliminate the need for physical stock verification?
No. Software records stock movements, but incorrect entries, missed transactions, product damage, and other physical issues can still create differences. Physical counts help check whether the actual goods match the recorded quantities.
Should damaged and expired products be included in physical stock verification?
They should be counted and recorded, but kept separate from normal saleable stock. Their condition and status should be documented, and any write-off or disposal should follow the appropriate business and regulatory procedures.
What is the difference between stock taking and a stock audit?
Stock taking is the physical counting of available goods. Physical stock verification compares that count with inventory records. A stock audit may involve a broader review of stock quantities, valuation, condition, documents, and controls, sometimes performed by an independent reviewer.
Conclusion
Physical stock verification helps you understand whether your inventory records match the actual products available in your shop.
Start by preparing the premises, completing pending entries, organising products, and controlling stock movement during the count. Count every section carefully, verify important items again, and compare the results with recorded quantities.
When differences appear, investigate the reason before making adjustments. Maintain supporting records and schedule regular checks for important, fast-moving, and high-risk products.
Whether you operate a kirana store, pharmacy, hardware shop, clothing business, fertilizer shop, or mobile accessories store, a consistent stock-verification process can help you maintain more accurate inventory records and make better purchasing decisions.
- #Physical Stock Verification
- #Stock Taking
- #Inventory Control
- #Stock Discrepancy
- #Retail Operations